
Version: 1.0.0 (Last Updated: 24-02-24)
LMS APP is a complete online course learning management mobile app with backend and web admin panel. The app is designed for both Android and iOS platforms are built using the Flutter framework, and Firebase is used as the backend. A subscription-based business model has been implemented, allowing users to access premium courses through the subscription of your premium plans. Free courses are also available, but users will see ads during their use. The combination of free courses with ads and premium plans provides flexibility for users and a dual-revenue model for your business.
– Last update: 24 February 2024
– Files Included: Full Flutter Source Code (iOS, Android, Web Admin)
– Compatible with Flutter latest version 3.16.x
License Details
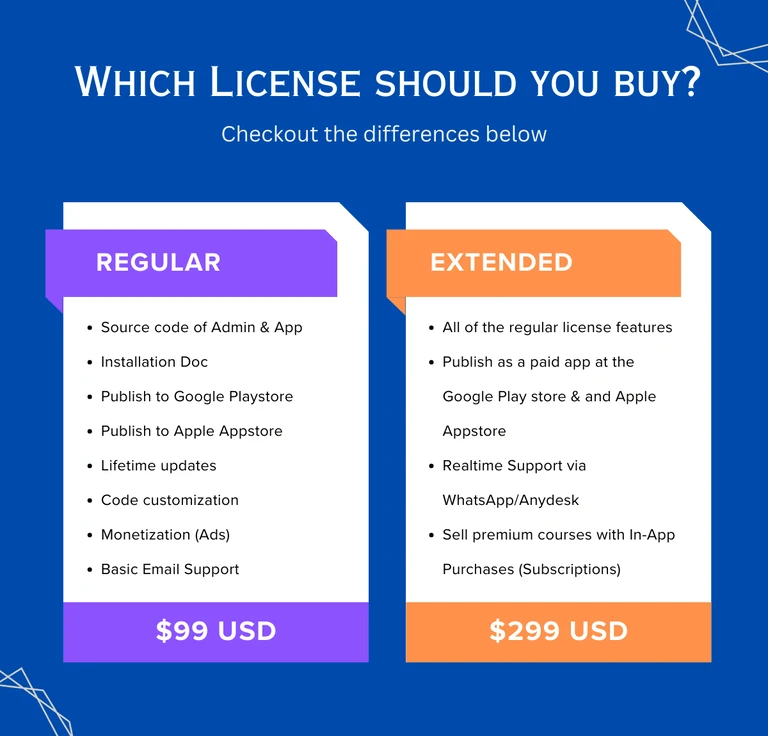
LMS APP is constantly being updated with new features, bug fixes, and adjustments. Below is a full listing of change log information.
#Version: 1.0.0
24 February 2024
- Initial release
Welcome to the LMS APP Configuration Document. This is the installation doc for both admin and app. You can build the admin panel and app (Android & iOS) by following this doc.
So, You will get two source code files. One is for the Admin Panel and the other one is for the App. Both are developed on the flutter framework. So, You need to install flutter on your computer first to set up both. You need to follow the admin panel setup first and then go for the app setup.
🚀ADMIN SETUP
1. Flutter Installation
The complete application (both admin & app) has been developed & built on Flutter. First, You have to install Flutter on your computer. You can use Both Visual Studio Code & Android Studio as IDE for Flutter. The steps are the same for both IDEs.
To install flutter on your computer, follow the official documentation from Google. Flutter Official Site: https://flutter.dev/.
You can follow these YouTube videos to install Flutter too.
- For Mac: https://www.youtube.com/watch?v=9GuzMsZQUYs
- For Windows: https://www.youtube.com/watch?v=T9LdScRVhv8
Important Notes:
- Make sure you have installed the latest stable version of Flutter. If everything is okay then you can follow the further steps below.
- The latest stable version of Flutter 3.19.x has some issues right now. Please use Flutter stable version 3.16.9 for now.
- A Mac (Apple Desktop/laptop) device and an Apple developer account are required for the iOS setup. If you don’t have both of them, you can ignore the iOS steps.
2. Code Setup
After purchasing the app you will get a .zip file. Unzip it. Inside the main_files folder, you will get a folder named lms_admin. This is the source code of the admin app. You have to work on this to set up your admin panel. Now open your IDE(Android Studio/VSCode) and open the lms_admin folder on your IDE. Wait some time to load the project.
Now go to the IDE terminal and run the following commands one after one :
After that, run the following command below:
flutter clean
flutter pub get

Make sure these commands should be run from the root directory of the code.
These commands will clean the project and get the required packages. Wait some time to get all the packages.
3. Firebase Setup
We have used the Firestore Database from Google as the backend for this project.
- First, Go to the Firebase Console and sign in with your email account, and go to the console.
- Create a project by your app name. And go to the project overview.

- Click on the plus icon and then click on the web icon. You will see a popup like the second picture below:


Input the name as Admin Panel and fill in the checkbox because you need hosting too and then click on register app. After that, Skip the other options by clicking next. (Don’t input a custom name for hosting else you need extra setup for this which is not recommended)
Now go to Project Settings. At the bottom, Select the Admin Panel and copy the selected lines shown in the picture below:

- Now, go to your IDE and open the lib/firebase_option.dart file and paste the line there.

That’s it.
3.1 Firestore Database Setup
Follow the steps below:
- From your firebase console, click on the Firestore Database and then click on the create database button.

- Now select the production mode and click on Next > Enable.
3.2 Database Security Rules
From the Firestore Database, Click on the Rules tab and copy and paste the following code below:
Click on the Publish button to publish the security rules. That’s it.
3.3 Database Index Setup
From the Firestore Database, Click on the Indexes tab and click on the Add Index. You have to create five indexes for the database.
- Enter reviews as Collection ID, course_author_id into the first field and set Ascending, Enter created_at in the second field and set Descending, Enter __name__ in the third field and set Descending and then select Collection as query scope and save it.
- Enter courses as Collection ID, cat_id into the first field and set Ascending, Enter id in the second field and set Ascending, Enter __name__ in the third field and set Ascending and then select Collection as query scope and save it.
- Enter courses as Collection ID, status into the first field and set Ascending, Enter created_at in the second field and set Descending, Enter __name__ in the third field and set Descending and then select Collection as query scope and save it.
- Enter reviews as Collection ID, course_id into the first field and set Ascending, Enter created_at in the second field and set Descending, Enter __name__ in the third field and set Descending and then select Collection as query scope and save it.
- Enter courses as Collection ID, cat_id into the first field and set Ascending, Enter status in the second field and set Ascending, Enter id in the third field and set Ascending, Enter __name__ in the fourth field and set Ascending and then select Collection as query scope and save it.
This may take 3-5 minutes to activate. After completing this, your index page should look like this:

3.4 Push Notification Setup
- From your Firebase console, go to the Project Settings > Cloud Messaging Tab. You need to enable the Cloud Messaging API (Legacy) which is disabled now.
- Click on the Manage API in Google Cloud Console and go to that page and enable the API.

- After that, refresh the cloud messaging tab and you see that it is enabled and has a key. Copy that Server Key.

- Now go to your IDE and open lib/configs/app_config.dart file and replace the server token that you have just copied. That’s it.
3.5 Firebase Storage Setup
From your Firebase console, go to Build>Storage and then Click on Get Started, and then select Start in production mode and Next>Done.
Now, go to the Rules tab and copy and paste the following code there.
rules_version = ‘2’;
service firebase.storage {
match /b/{bucket}/o {
match /{allPaths=**} {
allow read: if true;
allow write: if request.auth != null;
}
}
}
3. Click on Publish to publish the rules.
4. App Configs
4.1 Change App Information
From your IDE, go to the lib/configs/app_config.dart file.

- Change the App Name.
- Change the theme color if you want.
4.2 Change Logos
Default Logo
To change the logo, First, rename your logo to logo.png and make sure the icon is in .png format. Now drag & drop your logo to the assets/images folder and replace it with our logo. That’s it.
Dark Logo
To change the dark logo, First, rename your logo to logo_dark.png and make sure the icon is in .png format. Now drag & drop your logo to the assets/images folder and replace it with our logo. That’s it.
5. Upload to Firebase Hosting
5.1 Install the firebase-tools CLI
Skip this step if you already have Firebase tools installed. If you do not have this, you must install that first.
- npm download link: https://nodejs.org (Download and install it)
If you are not sure whether npm is installed on your machine, run $ npm -v , and see if it lists a version number. If it does, then you already have npm. If it says “command not found”, you need to install it.
Once npm is installed, run the following command:
npm install -g firebase-tools
firebase-tools is now installed!
5.2 Install the required command line tools
- Log into Firebase using your Google account by running the following command:
firebase login

Type Y and you will be redirected to your browser.
Follow the command prompt and the link in your browser. Accept the permissions by clicking Ok. When you return to your terminal you should see that you are now logged in.
Now you have to initialize the firebase. Run the following command:
firebase init

- Use the arrow keys to navigate the cursor to Hosting and hit the spacebar to select it, then press enter. Now you will see this screen:

Select an existing project by pressing Enter. Use the arrow keys to select the project you have made in the Firebase console.
Next, enter build/web as the public directory and press enter, then enter y (for yes) to select the single page app option.
Enter n (for no) to Set up automatic builds and deploys with the GitHub option.

5.3 Build The Web App
Run the following command to build the app for the web:
flutter build web --web-renderer html --release
5.4 Upload to Hosting
Run the following command to upload the admin app to the Firebase hosting:
firebase deploy

After this command, you will get a Hosting URL from Firebase which will be your Admin URL.
6. Admin Credentials Steup
Admin Username & Password Setup
- From your Firebase Console > Your App, go to the Build > Authentication > Sign-in method tab and Enable Email/Password, and Save it.

- Now go to the Users tab and click on the Add User button and create a new account by providing your email and password.
The username and password will be the admin email and password.


- Copy The User UID which is required for the next step. Now you have to create a record of the account you have created in the database.
- Go to the Build > Firestore Database and create a collection named users by clicking on the Start Collection button.

After clicking Next, you will get a new document form.
Use the user Id that you have copied as Document ID. Create a field named email and use your admin email as value. Create another field named name and enter your name as a value. Create another filed named role and the type must be an array and write admin as the first value of that array. Create another field named created_at and the type must be timestamp and select a date and time as values.
The fields and types should be the same as shown in the picture below.

Save it and after creating the user collection and document, your document details will look like this:

That’s it. Your admin account has been created. You can now log into your admin panel using the email and password you have created.
7. Conclusion
Hopefully, you have finished all of the steps and got an admin panel URL. You can add some content before going to the app setup.
📱APP SETUP
1. Introduction
- Make sure you have configured your admin panel first. If everything is okay, you can follow the further steps. You can use Android Studio or Visual Studio Code.
- Make sure you have installed the latest version of flutter which was required to configure the admin panel. If not, please follow the Flutter Installation step from the Admin Setup.
- Note: A Mac (Apple Desktop/laptop) device and an apple developer account are required for the iOS setup. If you don’t have both of them, you can ignore the iOS steps.
2. Code Setup
Open the source/lms_app folder on your IDE (VSCode or Android Studio) and wait some moment to load the project.
– Run the following command on the IDE terminal to clean the whole project first and get all the required packages..
flutter clean
flutter pub get
Now, your project is ready for configuration.
3. Firebase Setup for Android
3.1 Android Package Name Setup on Firebase
- Go to the Firebase console > Project overview page. Click on the Add app and then the Android Icon. Enter your Android package name.

Your package name should be like com.your_name.your_app_name . Like com.microsoft.skype. You can use the same package name for Android & iOS. iOS doesn’t support underspace in the package name. So, keep in mind that if you want to use the same package name for both Android & iOS.
- Click on the register app and skip other steps by clicking next. That’s it.
3.2 Change Package Name Android
Now, you have to change the package name in the source code. You have to use the same package name that you have registered in the firebase console.
- Go to your IDE and now you have to change the package name of your app. Run the following command from your IDE terminal by changing the package name with yours.
flutter pub run change_app_package_name:main com.new.package.name
Don’t forget to replace com.new.package.name with your package name.
That’s it. Your Android package name setup is complete.
3.3 Generate Debug Certificate
You need to generate 2 signing certificates for the Google sign-in feature. Debug certificate is required for testing purposes. If you want to test Google signing during development, then you should follow the steps. Otherwise, you can ignore it.
- To generate a debug certificate, run this command on your terminal from your app root directory.
- MAC: keytool -list -v -alias androiddebugkey -keystore ~/.android/debug.keystore
- WINDOWS: keytool -list -v -alias androiddebugkey -keystore %USERPROFILE%.androiddebug.keystore
If this command doesn’t work, then go to this link and copy the debug command from there according to your operating system.
- Use android as a debug password when the terminal asks for a password.

- Copy the SHA1 certificate code and go to Firebase Console > Your Project > Project Settings and click on the Android icon and then add the SHA1 code by clicking Add fingerprint button. Look at the picture below:

3.4 Generate Release Certificate
To generate a release certificate, You have to generate a Keystore file. To generate a Keystore file, run this command below from the root of your project directory.
- MAC: keytool -genkey -v -keystore ~/upload-keystore.jks -keyalg RSA -keysize 2048 -validity 10000 -alias upload
- WINDOWS: keytool -genkey -v -keystore c:UsersUSER_NAMEupload-keystore.jks -storetype JKS -keyalg RSA -keysize 2048 -validity 10000 -alias upload
- Enter your details and remember the password. After this, you will get an upload-keystore.jks Keystore file.
- Locate this file and move the file into the android/app folder and copy the path by right-clicking on the upload-keystore.jks file.
- Then go to the android/key.properties file and replace the path of your Keystore file. Then also replace the password that you have inputted to generate the Keystore file.

Now you can generate a release certificate, To do that,
- Run with replacing your alias_name and keystore_location.
keytool -list -v -keystore keystore_location -alias alias_name
Your alias_name is upload and keystore_location is the path(directory) of the upload-keystore.jks file.
- After that, you will get a SHA1 code. Copy that code and add it to your Firebase Console > Project Settings > Android, where you previously added a debug SHA1 code.
3.5 Google Sign In Setup for Android
- Go to Firebase console>Your Project>Authentication>Sign-in-method and enable both email/password and google and save it.

- You have to configure some stuff for Google sign-in. Go to the Google Cloud Console.
- Make sure you are signed in with the same account with which you have created the Firebase project.
- Also, make sure that on the top-left corner, your project is selected for which you are filling this consent.

- Go to the Credentials → OAuth consent screen tab and start filling out the form.
- Enter the Application name, Application logo, and Support email.

- In all these places, you have to enter the same link starting with http:// and then your app domain name which I have marked with green below.
- Then, scroll down and fill in the Application Homepage link, Application Privacy Policy link, and Application Terms of Services link.

- Click on Save. That’s it. You have completed your Google sign-in setup for Android.
3.6 Additional Firebase Setup for Android
Now, you have to connect the Firebase with your code project. Follow the steps below:
- Run the following command from your IDE terminal: firebase login
After this command, you will get a link prompt to log in with the email account that you have used on Firebase. Login with that by allowing the required criteria.
- Run the following command from your IDE terminal: dart pub global activate flutterfire_cli
- Run the following command from your IDE terminal: flutterfire configure
- Select Your App and Press Enter.

- Select Android and press Enter.

Use arrow keys & space to select/unselect
You can select both Android & iOS if you want to build for both. If you do that, you can ignore the 4.4 Step.
After this command, A google-services.json file in the android/app folder and A firebase_options.dart file in the lib folder will be added. If you found them, your Firebase configuration is successful.
4. Firebase Setup for iOS
4.1 iOS Package Name Setup on Firebase
- Go to the Firebase console > Project overview page. Click on the Add app and then the iOS icon. Enter your package name. You can use the same package name that you have used for Android.

- Click on the register app and skip others by clicking next.
- Now go to project settings and click on ios and download the GoogleService-info.plist file.
- Then go to the ios/Runner directory and paste the file here.
- Now, Open the iOS folder on Xcode by right-clicking on the iOS folder from VSCode or Android Studio and go to the runner folder, and move the GoogleService-info.plist file here. You will get a popup and click yes or confirm the popup message.
- Now, open the GoogleService-info.plist file in your IDE and copy the REVERSED_CLIENT_ID. (See the picture below)

- Go to the ios/Runner/Info.plist file and replace the REVERSED_CLIENT_ID here.

4.2 Change Package Name iOS
- Go to the ios/Runner/Info.plist file and replace the CFBundleIdentifier value with your iOS package name. (See the picture below)

4.3 Apple Login Setup
Only for iOS: An paid apple developer account and Xcode app on your mac is required.
- From your IDE, Right click on the ios folder and click on open on Xcode and then go to runner > sign in & capability tab.

Add Sign in with Apple. We already did this in the project. If this is not available in the project, do this by yourself.
Now go to your firebase console > your project > authentication page and enable the apple sign-in option. You don’t have to put anything in the text fields.

One more thing, when you configure Firebase push notification for iOS in the next step, make sure you also tik on the Sign In with Apple option in the identifier on the apple developer page.
4.4 Additional Firebase Setup for iOS
Now, you have to connect the firebase with your code project. Follow the steps below:
- Run the following command from your IDE terminal: firebase login
After this command, you will get a link prompt to log in with the email account that you have used on firebase. Login with that by allowing the required criteria.
- Run the following command from your IDE terminal: dart pub global activate flutterfire_cli
- Run the following command from your IDE terminal: flutterfire configure
- Select Your App and Press Enter.
- Select iOS and press Enter.

After this command, Your iOS app information from firebase will be added in the lib/firebase_options.dart file. If you found them, your firebase configuration is successful.
5. Push Notification Setup
5.1 Android Notification Setup
For Android, You don’t have to do anything. We already integrated the procedures into the project.
5.2 iOS Notification Setup
For iOS, Go to this link and follow the instructions. This is a well-written doc from the Flutter Team. You can ignore the (Advanced, Optional) step from there.
6. Multi-Language Setup
You can skip this setup for now. This is not a mandatory setup to run this app.
So, we have used 10 languages in this app. English, Spanish, Hindi, Arabic, Portuguese, French, Chinese, German, and Indonesian.
You can add as many languages as you want. The multi-language feature is only for all of the static texts in the app. It’s static and not related to the database.
English is the default and starting Language. You can change the default language too if you want.
6.1 Editing An Existing Language
If your language is already available on the list and you want to make some changes, then follow the steps below:
Example: If you want to change some text in the Spanish language, then open the assets/translations/es-ES.json file and edit only right-side values.

- Don’t edit the keys (Left side values)
6.2 Adding A New Language
If you want to add a new language that is not available in the default list, follow the steps below:
- First, go to the assets/translations folder from your IDE. Add a .json file here with <language_code>-<country_code>.json name. Now go to the assets/translations/en-US.json file and copy everything from this file and paste it to your newly created .json file.

- Now, Rename the all right-side strings. Look at the es-ES.json file and you will understand what to do.
- Now go to lib/config/language_config.dart the file and add your language code to the language list.

Your code should look like this: “<Language_Name>”: [<‘Language_Code’>, <‘COUNTRY_CODE’> ]
- For Android, you don’t have to do anything.
- For iOS, go to ios/Runner/Info.plist and add your language code in a string. Look at the picture below.

- Add <string>your_language_code</string> inside the array. That’s it.
6.3 Removing An Existing Language
To remove any language that is available in the list, please follow the steps below:
- Go to the asset/translations folder and delete the your_language_code.json file that you want. (You shouldn’t delete the en-US.json file because this is the default language).
- Now go to lib/config/language_config.dart file and remove the list item that you want to remove from the langauges list.
- And finally go to ios/Runner/Info.plist and remove the string. That’s it. (Only for iOS)
6.4 Start Locale Setup
English is added as the start language of the app by default. If you want to add any other language as a Start Language then go to the lib/language_config.dart file and replace the startLocale value with your locale value.
6.5 Disable Multi-Language Feature
You can disable the multi-language feature if you want. For this case, English will be used as the default and only language in the app. If you do that, the changing language option will be hidden from the app and the app will run with the default language.
To disable it go to the lib/configs/features_config.dart file and set the isMultilanguageEnbled value to false.

7. Ads Setup
Admob Ads
You can skip this setup for now and can configure it later. We have enabled AdMob ads by default with test ad unit IDs. You can enable/disable ads from the admin panel.
We have added 2 types of AdMob ads.
- Banner Ads: At the bottom of the course details and all courses views screens.
- Interstitial Ads: An interstitial ad will be shown when users open any leeson. And also in the quiz lesson, when user comeplete the quiz.
You can control ads from the admin panel. We have added an option to turn off/on ads at any time you want. Don’t enable ads on the admin panel if you have not enabled ads in the app.
We have used Admob ads by default with test unit IDs. To test the ads, you should test with the test unit IDs. Before releasing the app for production, make sure you have changed the app IDs and ad unit IDs with yours. Admob is applied by default. So you don’t have to do anything before releasing.
7.1 Admob Setup for Android
Follow these steps only for production (release):
- From your AdMob account, create an app for Android. You will get an app ID for Android.
- Create 2 ad units. One banner and One Interstitial.
- Now, go to the android/app/src/main/AndroidManifest.xml file and change the AdMob app ID (Android) with yours.

- Go to the lib/configs/ad_config.dart file and change the appIdAndroid, interstitialAdUnitIdAndroid & bannerAdUnitIdAndroid with your values.
Ignore the iOS IDs if you don’t want to make the app for iOS.
7.2 Admob Setup for iOS
- You shouldn’t use the android values here.
Follow these steps only for production (release):
- From your AdMob account, create an app for iOS. You will get an app id for iOS.
- Create 2 ad units. One banner and One Interstitial.
- Now, go to the ios/Runner/Info.plist file and change the AdMob app(iOS) with yours.

- Go to the lib/configs/ad_config.dart file and change the appIdiOS, interstitialAdUnitIdiOS & bannerAdUnitIdiOS with your values.
8. App Information Setup
- Go to the lib/configs/app_config.dart file and change the existing values with all of your details.

- Change the app name, app theme color, android package name.
- iOS app ID (Only for iOS and you can ignore this for now)
iOS app ID can be found from your Apple developer account > Appstore Connect > Your App > App Information page. (This is required to open your app at the AppStore app to provide ratings)
8.1 Change App Name
- Android: Go to the android/app/src/main/AndroidManifest.xml file and Change your app name.

- iOS: Go to the ios/Runner/Info.plist file and Change your app name.

8.2 Change App Icons & Images
8.2.1 Change App Icon
The icon should be in .png format.
- Go to the assets/images and delete the default icon (icon.png).
- Now upload your app icon as png in the assets/images folder and rename it to icon.png
- Now run the following command on the terminal: “flutter pub get“, then “flutter pub run flutter_launcher_icons:main“.
This command will create an android & iOS icons for your app.
That’s it. For more info, visit this site.
8.2.2 Change App Logo
The logo should be in .png transparent format.
- Go to the assets/images and delete the default logo (logo.png).
- Now upload your app icon as png in the assets/images folder and rename it to logo.png
8.2.3 Change Splash Icon
The splash icon should be in .png format.
- Go to the assets/images and delete the default splash icon (splash.png).
- Now upload your app icon as png in the assets/images folder and rename it to spash.png
8.2.4 Change On-Boarding Images
These images must be in .svg format. We have used images from the following site: https://storyset.com. You can get the images from there too.
- Select your 3 images and rename them to inro_1.svg, intro_2.svg and intro_3.svg.
- Go to the assets/images folder and paste and replace with the existing images.
You can disable the on-boarding screen from the app if you want. You can do that directly from the admin panel. If so, you don’t have to do this step.
9. Run The App
- Before doing that, Please make sure that you have followed all of the previous steps. Otherwise, it won’t work.
- Before doing this, connect An Android Emulator from Android Studio or A Real Android device or An iOS Simulator from Xcode, or An real iOS device.
- Before running the app, clean the project & get the packages by running the following commands one after one:
flutter clean
flutter pub get
And finally, run the following command to run the app:
flutter run
10. Releasing the Android App
at Google Play Store
- Make sure that you have done all the things that are required for the android release.
To test the released android app, run the following command on the terminal:
flutter build apk --split-per-abi
You will get 3 apk files from the build/app/output/apk/release folder. You can test the app-armeabi-v7a-release.apk file on your android device.
- If you want to publish the app in the google play store, don’t upload any of the following apk files. Use an appbundle file which is recommended by Google
To generate an appbundle, run the following command on the terminal:
flutter build appbundle
After that, you will get a .aab file in the build/app/output/appbundle/release folder.
Now you can upload this .aab file to the google play store.
11. Releasing the iOS App
at Apple AppStore
Make sure that you have done all the things that are required for the ios release.
- Follow the official doc from the flutter team here.
12. Subscriptions Setup
In-App-Purchase (Sell subscriptions to users )
This is a premium feature to sell subscriptions to your users. Users can purchase subscriptions using Google Pay and Apple Pay.
An extended license is required for this feature. You need to upgrade your license to Extended from your admin panel. Otherwise, you can’t assign courses as premium and the subscription feature won’t be available in the app.
12.1 Android Setup
Setup Payment Profile
From your Google Developer Console Account > Setup > Payment Profile, you need to add your payment profile. Like adding your bank account. If you have already added that, you can ignore it.
License Testing Setup
In this step, you need to add some testers who can test the IAP product in the app and purchase points without any real payment.
From your Google Developer Console Account > Setup > License testing, Add some email addresses.

Upload Initial Build at Google Play Store
To activate IAP for your app in the Google Play Store, you need to add the billing permission in the code section and upload an initial build at the Google Play Store as Close Testing. (Only the testers you will assign in the upcoming step can test the app). You shouldn’t upload it on production.
Add the Billing Permission
From the App source code, Go to the lms_app/android/app/src/main/AndroidManifest.xml file and enable the selected line shown in the picture below. This permission will enable the billing and IAP at the Google Play Store.

- If you already uploaded your app in production and released it at the Google Play Store, you also need to follow the same step (Add billing permission and upload it as a Close Testing version).
Without uploading any new version in the Closed Testing, you won’t see the IAP features.
- Before going to the next steps, make sure you have uploaded a new build in the Closed Testing and published it.
Configure Subscriptions
After publishing a new version with Close testing, you will see the Subscriptions option on your app sidebar.

Create Subscriptions
From Your App > Monetize > Subscriptions, create a subscription by clicking on the Create subscription button.
- Add Product ID.
Product ID can be anything but unique. You must add the duration in days in your product ID. For example,
myplan_7 (for 7 days),
myanotherplan_30 (for 30 days)
- You can’t use any other number in your product ID except the days. Example,
myplan1_30, myplan2_365
This is not acceptable.
Look at the shown below, you will understand how to use product IDs.


- Add Product Name which will be shown on the app.
- After creating the product, add subscription details > Description.

- Add base plan ID.
You have to create a base plan for your product. You can create many base plans but only one will be active. A base plan ID can be anything but unique. No extra requirements for that.
- Select Type > Prepaid and select the plan duration.
Plan duration must be aligned with your product_id. For example, if you select 1 week then your product ID must contain 7. If you select 1 month then your product ID must contain 30.

- Now save the base plan.
That’s it. Your first subscription plan has been created. This way you can create as many plans as you want. We have used 3 plans for our demo app.
12.2 iOS Setup
Sign A Paid Application Agreement
The first and foremost thing you have to do is to accept the agreement. Go to app store connect -> Agreements, Tax, and Banking. You will see two agreements. One for Free Apps and the second for Paid Apps.
Free apps agreement doesn’t require you to add your bank account and fill in the Tax information, but Paid Apps do require. You need to accept the Paid Apps agreement. Once you accept the agreement and fill in the necessary information, your status of agreements will be active. Just like this 👇🏻👇🏻👇🏻

Configure Subscriptions in App Store Connect
From your Appstore Connect, go to Your App > Subscriptions.
- Create A subscription group. Group name can be anything. You will create all of your subscription products within this group.

In that subscription group, create a subscription product by clicking on the + button.

- Enter reference name and Product ID.
Product ID can be anything but unique. You must add the duration in days in your product ID. For example,
- myplan_7 (for 7 days),
- myanotherplan_30 (for 30 days)
You can’t use any other number in your product ID except the days. Example,
- myplan1_30, myplan2_365
This is not acceptable.
Look at the shown below, you will understand how to use product IDs.

- After creating the product, Select your plan duration.
Plan duration must be aligned with your product_id. For example, if you select 1 week then your product ID must contain 7. If you select 1 month then your product ID must contain 30.

- Select countries and set prices for your subscription.
- Add AppStore Localization which will be visible to the users.

- Save the product. That’s it.
That’s it. Your first subscription plan has been created. This way you can create as many plans as you want. We have used 3 plans for our demo app.
Add the In-App Purchase Feature in Xcode
From the app source code open the lms_app/ios folder in your Xcode App. Now go to the Runner > Signing & Capabilities and click on the + Capability and add the In-App Purchase option. That’s it.

12.3 Code Setup for Subscriptions
- Make sure you have completed all of the previous steps of 12, 12.1 & 12.2.
Go to the lib/iAP/iap_config.dart file and add your Product IDs here separated with commas as shown in the picture below

After that set the iAPEnaled value to true.

That’s it. Your subscription setup is completed. Now, you can test the app and the products and publish your app in production by uploading a new version.
To test the In-App Purchases feature, use a real Android or iOS phone. Emulators/Simulators won’t support this.
Enable/Disable Specific Features

You can disable/enable some specific features of the app from this file. File Location: lms_app/lib/configs/feature_config.dart
Disable Facebook Login
As per the new policy from Meta, A registered organization/company is required to enable Facebook login in the app or website. If you are an individual and having issues with fb login steps, then you can easily disable fb login from the app. To do that,
Change the fbLoginEnabled value to false. That’s it.

Disable Multi-Language Feature
If you want to use the app language only in English and remove the language selection dialog from the app, then you can disable that easily. To do that,
Change the MultiLanguageEnabled value to false. That’s it.

Customize Specific Features from the Admin Panel
You can customize many features from your admin panel. Check out the Admin Panel > Settings tab for more details.